Creating a successful website is more than just choosing a beautiful template and adding some text. It’s about building something that speaks to your brand, engages your audience, and performs well on search engines. Today, we’re diving into a web design success story that shows the journey from concept to launch and the incredible transformation that took place.
This story involves a local business that partnered with me, a web designer Phoenix businesses trust, to take their online presence to the next level. We’ll explore the entire process, from understanding their needs to designing, building, optimizing, and finally launching their new site. If you’re considering a website overhaul or starting from scratch, follow along for insights and tips on creating a site that truly stands out.
1. Understanding the Client’s Needs
The Initial Consultation
The journey began with an in-depth consultation. The client—a Phoenix-based retail business—had a website that felt outdated and wasn’t performing well in terms of traffic or conversions. They wanted a site that not only looked good but also reflected their brand identity and converted visitors into customers.
During this consultation, I gathered information about their brand, target audience, goals, and any specific features they wanted on the site. It was important to get a clear vision from the start, as this would guide every decision moving forward.
Learn more about how I approach initial consultations.
2. Research and Planning
Competitor and Market Analysis
Once I had a good understanding of what the client wanted, I conducted market research to analyze their competitors and identify industry trends. By studying other sites in the same space, I could see what worked well and what didn’t. This research phase also gave me insights into design and functionality choices that would make the client’s website stand out.
Defining Goals and KPIs
In addition to research, we established clear goals and key performance indicators (KPIs). Our primary goal was to increase conversions, but we also wanted to improve user engagement and SEO performance. Setting these objectives early helped ensure that every design and functionality choice was aligned with achieving tangible results.

3. Wireframing and Prototyping
Sketching the Layout
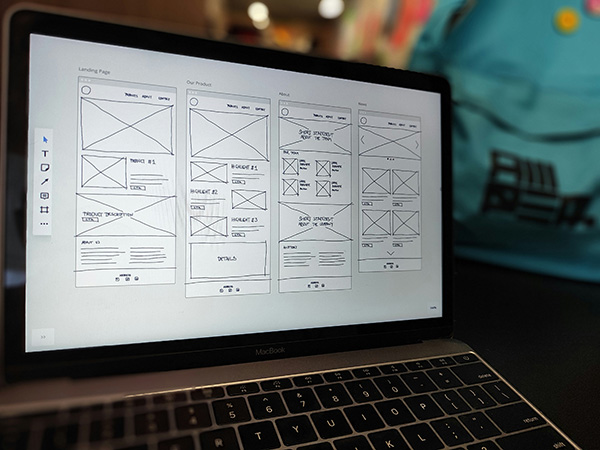
The next step was to create wireframes—a simple, visual representation of the layout and structure of the website. Wireframes act as a blueprint, allowing the client and I to visualize how the site will be organized without getting into specific design details. This step is essential for ensuring a smooth user experience.
Creating Interactive Prototypes
Once the wireframes were approved, I moved on to creating a clickable prototype. Tools like Figma and Adobe XD make it easy to build interactive prototypes that simulate the final site experience. The client could click through the pages, get a feel for the flow, and provide feedback before we even started coding. This iterative process helped us fine-tune the site’s layout and functionality.
4. Designing the Look and Feel
Choosing the Color Palette and Fonts
With the structure in place, it was time to focus on the design. We worked closely to choose a color palette and fonts that aligned with the client’s brand identity. As a web page designer, I made sure these visual elements conveyed the personality and professionalism of the business. This stage was all about crafting a look and feel that would resonate with their target audience.
Integrating Brand Elements
We also incorporated brand-specific elements like the client’s logo, unique icons, and high-quality images. For many local businesses, custom photography can set the site apart, so we arranged a photoshoot to capture authentic visuals. Consistent brand elements help create a cohesive experience that builds trust and recognition among visitors.
Explore how brand-focused design enhances websites.
5. Building the Website
Bringing the Design to Life with Code
After the client approved the design, it was time to bring everything to life through coding. As a web designer in Phoenix, I specialize in both design and development, which allows me to build sites that look great and function seamlessly. We used a combination of HTML, CSS, and JavaScript to create a responsive, dynamic website.
For clients with content-heavy sites, I often recommend using WordPress as a CMS. This client, however, wanted a custom-coded site that was lightweight and fast-loading, so I built it from scratch. Tools like GitHub made collaboration and version control a breeze.
Mobile Optimization
With mobile traffic now accounting for over half of all website visits (source), it was essential to ensure that the site was fully responsive. We tested the design on various devices to make sure it looked and functioned well on both desktops and smartphones.
6. SEO and Performance Optimization
On-Page SEO
Once the structure was in place, I focused on optimizing the site for search engines. As an SEO specialist, I know how important it is to implement on-page SEO practices that drive organic traffic. This included optimizing meta tags, using alt tags for images, and creating keyword-rich content that still felt natural and engaging for readers. I used tools like Ahrefs and SEMrush to conduct keyword research and improve on-page SEO.
Improving Site Speed
A fast-loading website not only improves user experience but also boosts SEO rankings (source). I used Google PageSpeed Insights to identify any performance issues, optimized images for faster loading, and minified CSS and JavaScript files. By the end of this stage, the site was loading significantly faster, contributing to a better overall experience for users.
7. Testing and QA
Ensuring a Bug-Free Experience
Before launching, it was crucial to go through extensive testing. We ran a series of quality assurance (QA) tests to catch any potential issues. This included cross-browser testing, checking for broken links, and ensuring all forms and interactive elements worked correctly. Tools like BrowserStack were helpful in testing the site across various browsers and devices.
Client Review and Feedback
The client was also invited to review the test site and provide feedback. We made a few final tweaks based on their input, ensuring that every detail met their expectations. Collaboration during this stage is essential to catch any last-minute changes or additions before the big launch.
Learn more about our testing and QA process.
8. Launch and Post-Launch Support
Going Live
After months of planning, designing, and building, it was time to launch! We chose a low-traffic time for the launch to ensure a smooth transition. The site went live without a hitch, and the client was thrilled to see their vision come to life.
Monitoring and Analyzing Performance
The launch is only the beginning. We set up Google Analytics and Google Search Console to track site performance and SEO progress. Over the first few months, we monitored metrics like bounce rate, conversion rate, and organic traffic. This data allowed us to make data-driven adjustments, optimizing the site’s performance even further.
Conclusion: The Power of a Collaborative Web Design Process
This web design success story showcases the power of a collaborative and strategic approach. By working closely with the client at every step, we created a website that not only looked great but also delivered real results. From understanding the client’s vision to optimizing the site for SEO, each step contributed to the final product: a high-performing website that met the client’s goals and enhanced their online presence.
If you’re considering a website redesign or starting a new project, remember that the right web designer and SEO specialist can make all the difference. With careful planning, thoughtful design, and strategic execution, your website can be a powerful tool that drives your business forward.
FAQs
Q1: What’s the importance of wireframing in web design?
Wireframing provides a visual blueprint of the website layout, ensuring a smooth user experience and clear navigation structure before adding design elements.
Q2: How does SEO impact website success?
SEO improves a website’s visibility on search engines, driving organic traffic and increasing the chances of conversions. Optimized sites rank higher on Google.
Q3: Why is mobile optimization crucial?
With most users browsing on mobile devices, a mobile-optimized site ensures a consistent and user-friendly experience across all devices, boosting engagement.
Q4: What is on-page SEO?
On-page SEO involves optimizing individual pages on a website through techniques like keyword usage, meta tags, and content to improve search engine rankings.
Q5: How does professional web design improve brand image?
Professional web design enhances brand credibility, creating a visually cohesive and engaging experience that resonates with users and builds trust.
External Resources:
- Statista: Mobile Traffic Data
- Figma: Design and Prototyping Tool
- Adobe XD: Prototyping and Design
- WordPress: Content Management System
- Ahrefs: SEO Tools
- SEMrush: SEO and Marketing Tools
- Google PageSpeed Insights
- BrowserStack: Cross-Browser Testing
- Google Analytics
- Google Search Console
About Justin Bahr Marketing & Photography
Justin Bahr Marketing & Photography specializes in delivering exceptional marketing solutions and professional photography services tailored to meet the unique needs of businesses and individuals. With expertise in branding, web design, and headshot photography, Justin helps small businesses grow their online presence while capturing high-quality visuals that tell their story. Whether you’re seeking creative marketing strategies or timeless imagery, Justin Bahr is dedicated to providing a personalized, results-driven experience that exceeds expectations. Based in Phoenix, Arizona Justin serves clients locally and nationwide, helping them achieve their goals with precision and creativity.


